How Light Microscopes Work

microscopes
No, this is not a cool paiting, is a microscopy photography of a cardiac muscle section. Sebastian Condrea / Getty Images

Ever since their invention in the late 1500s, light microscopes have enhanced our knowledge in basic biology, biomedical research, medical diagnostics and materials science. Light microscopes can magnify objects up to 1,000 times, revealing microscopic details. Light-microscopy technology has evolved far beyond the first microscopes of Robert Hooke and Antoni van Leeuwenhoek. Special techniques and optics have been developed to reveal the structures and biochemistry of living cells­. Microscopes have even entered the digital age, using charge-coupled devices (CCDs) and digital cameras to capture images. Yet the basic principles of these advanced microscopes are a lot like those of the student microscope you may have used in your first biology class.

In this edition of HowStuffWorks, we will enter the tiny world of light microscopes and examine the various technologies that let them expose what is otherwise undetectable to the human eye.

Advertisement

The Basics

Diagram of a typical student light microscope, showing the parts and the light path

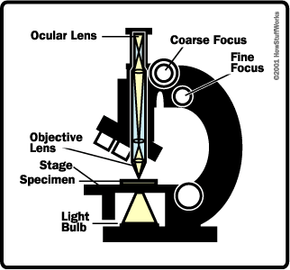
A light microscope works very much like a refracting telescope, but with some minor differences. Let's briefly review how a telescope works.

A telescope must gather large amounts of light from a dim, distant object; therefore, it needs a large objective lens to gather as much light as possible and bring it to a bright focus. Because the objective lens is large, it brings the image of the object to a focus at some distance away, which is why telescopes are much longer than microscopes. The eyepiece of the telescope then magnifies that image as it brings it to your eye.

Advertisement

In contrast to a telescope, a microscope must gather light from a tiny area of a thin, well-illuminated specimen that is close-by. So the microscope does not need a large objective lens. Instead, the objective lens of a microscope is small and spherical, which means that it has a much shorter focal length on either side. It brings the image of the object into focus at a short distance within the microscope's tube. The image is then magnified by a second lens, called an ocular lens or eyepiece, as it is brought to your eye.

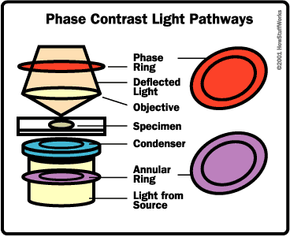
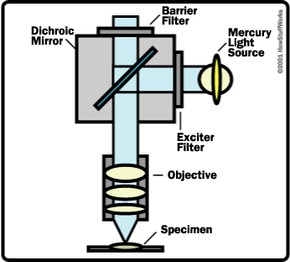
The other major difference between a telescope and a microscope is that a microscope has a light source and a condenser. The condenser is a lens system that focuses the light from the source onto a tiny, bright spot of the specimen, which is the same area that the objective lens examines.

Also unlike a telescope, which has a fixed objective lens and interchangeable eyepieces, microscopes typically have interchangeable objective lenses and fixed eyepieces. By changing the objective lenses (going from relatively flat, low-magnification objectives to rounder, high-magnification objectives), a microscope can bring increasingly smaller areas into view -- light gathering is not the primary task of a microscope's objective lens, as it is a telescope's.

We'll take a detailed look at the parts of a microscope later in the article.

Image Quality

Image of pollen grain under good brightness (left) and poor brightness (right)

When you look at a specimen using a microscope, the quality of the image you see is assessed by the following:

  • Brightness - How light or dark is the image? Brightness is related to the illumination system and can be changed by changing the voltage to the lamp (rheostat) and adjusting the condenser and diaphragm/pinhole apertures. Brightness is also related to the numerical aperture of the objective lens (the larger the numerical aperture, the brighter the image).
  • Focus - Is the image blurry or well-defined? Focus is related to focal length and can be controlled with the focus knobs. The thickness of the cover glass on the specimen slide can also affect your ability to focus the image -- it can be too thick for the objective lens. The correct cover-glass thickness is written on the side of the objective lens.
Image of pollen grain in focus (left) and out of focus (right)
  • Resolution - How close can two points in the image be before they are no longer seen as two separate points? Resolution is related to the numerical aperture of the objective lens (the higher the numerical aperture, the better the resolution) and the wavelength of light passing through the lens (the shorter the wavelength, the better the resolution).
Image of pollen grain with good resolution (left) and poor resolution (right)
  • Contrast - What is the difference in lighting between adjacent areas of the specimen? Contrast is related to the illumination system and can be adjusted by changing the intensity of the light and the diaphragm/pinhole aperture. Also, chemical stains applied to the specimen can enhance contrast.
Image of pollen grain with good contrast (left) and poor contrast (right)

In the next section, we'll talk about the different types of microscopy.

Advertisement

Types of Microscopy

Light path of a phase-contrast microscope

A major problem in observing specimens under a microscope is that their images do not have much contrast. This is especially true of living things (such as cells), although natural pigments, such as the green in leaves, can provide good contrast. One way to improve contrast is to treat the specimen with colored pigments or dyes that bind to specific structures within the specimen. Different types of microscopy have been developed to improve the contrast in specimens. The specializations are mainly in the illumination systems and the types of light passed through the specimen. For example, a darkfield microscope uses a special condenser to block out most of the bright light and illuminate the specimen with oblique light, much like the moon blocks the light from the sun in a solar eclipse. This optical set-up provides a totally dark background and enhances the contrast of the image to bring out fine details -- bright areas at boundaries within the specimen.

Here are the various types of light microscopy techniques:

Advertisement

  • Brightfield - This is the basic microscope configuration (the images seen thus far are all from brightfield microscopes). This technique has very little contrast; in the images you've seen so far, much of the contrast has been provided by staining the specimens.
  • Darkfield - This configuration enhances contrast, as mentioned above. See Molecular Expressions: Darkfield Microscopy for details and examples.
  • Rheinberg illumination - This set-up is similar to darkfield, but uses a series of filters to produce an "optical staining" of the specimen. See Molecular Expressions: Rheinberg Illumination for details and examples.

The following techniques use the same basic principle as Rheinberg illumination, achieving different results by using different optical components. The basic idea involves splitting the light beam into two pathways that illuminate the specimen. Light waves that pass through dense structures within the specimen slow down compared to those that pass through less-dense structures. As all of the light waves are collected and transmitted to the eyepiece, they are recombined, so they interfere with each other. The interference patterns provide contrast: They may show dark areas (more dense) on a light background (less dense), or create a type of false three-dimensional (3-D) image.

  • Phase contrast - This technique is best for looking at living specimens, such as cultured cells.
In a phase-contrast microscope, the annular rings in the objective lens and the condenser separate the light. The light that passes through the central part of the light path is recombined with the light that travels around the periphery of the specimen. The interference produced by these two paths produces images in which the dense structures appear darker than the background. See Molecular Expressions: Phase Contrast Microscopy for details and examples.
A phase-contrast image of a glial cell cultured from a rat brain
Photo courtesy Theresa M. Freudenrich
  • Differential interference contrast (DIC) - DIC uses polarizing filters and prisms to separate and recombine the light paths, giving a 3-D appearance to the specimen (DIC is also called Nomarski after the man who invented it). See Molecular Expressions: Differential Interference Contrast Microscopy for details and examples.
  • Hoffman modulation contrast - Hoffman modulation contrast is similar to DIC except that it uses plates with small slits in both the axis and the off-axis of the light path to produce two sets of light waves passing through the specimen. Again, a 3-D image is formed. See Molecular Expressions: Hoffman Modulation Contrast Microscopy for details and examples.
  • Polarization - The polarized-light microscope uses two polarizers, one on either side of the specimen, positioned perpendicular to each other so that only light that passes through the specimen reaches the eyepiece. Light is polarized in one plane as it passes through the first filter and reaches the specimen. Regularly-spaced, patterned or crystalline portions of the specimen rotate the light that passes through. Some of this rotated light passes through the second polarizing filter, so these regularly spaced areas show up bright against a black background. See Molecular Expressions: Introduction to Polarized Light Microscopy for details and examples.
  • Fluorescence - This type of microscope uses high-energy, short-wavelength light (usually ultraviolet) to excite electrons within certain molecules inside a specimen, causing those electrons to shift to higher orbits. When they fall back to their original energy levels, they emit lower-energy, longer-wavelength light (usually in the visible spectrum), which forms the image.

In the next section, we'll discuss fluorescence microscopy in greater detail.

Fluorescence Microscopy

Light path of an epifluorescence microscope

A fluorescence microscope uses a mercury or xenon lamp to produce ultraviolet light. The light comes into the microscope and hits a dichroic mirror -- a mirror that reflects one range of wavelengths and allows another range to pass through. The dichroic mirror reflects the ultraviolet light up to the specimen. The ultraviolet light excites fluorescence within molecules in the specimen. The objective lens collects the fluorescent-wavelength light produced. This fluorescent light passes through the dichroic mirror and a barrier filter (that eliminates wavelengths other than fluorescent), making it to the eyepiece to form the image.

The fluorescent molecules within the specimen can either occur naturally or be introduced. For example, you can stain cells with a dye called calcein/AM. By itself, this dye is not fluorescent. The AM portion of the molecule hides a portion of the calcein molecule that binds calcium, which is fluorescent. When you mix the calcein/AM with the solution bathing the cells, the dye crosses into the cell. Living cells have an enzyme that removes the AM portion, traps the calcein within the cell and allows the calcein to bind calcium so that it fluoresces green under ultraviolet light. Dead cells no longer have this enzyme. Therefore, living cells will fluoresce green, and dead cells will not fluoresce. You can see the dead cells in the same specimen if you mix in another dye called propidium iodide, which only penetrates the dead cells. Propidium iodide binds to DNA in the nucleus and fluoresces red under ultraviolet light. This double-dye technique is used in toxicology studies to determine the percent of a cell population that is killed when treated with some environmental chemical, such as a pesticide.

Advertisement

Fluorescent image of cultured rat-brain cells. Living cells stain with calcein (left) and dead cells stain with propidium iodide (right).
Photo courtesy Theresa M. Freudenrich
Fluorescent image of cultured rat-brain cells. Living cells stain with calcein (left) and dead cells stain with propidium iodide (right).
Photo courtesy Theresa M. Freudenrich

Fluorescence-microscopy techniques are useful for seeing structures and measuring physiological and biochemical events in living cells. Various fluorescent indicators are available to study many physiologically important chemicals such as DNA, calcium, magnesium, sodium, pH and enzymes. In addition, antibodies that are specific to various biological molecules can be chemically bound to fluorescent molecules and used to stain specific structures within cells. See Molecular Expressions: Fluorescence Microscopy for details and more examples.

In the next section, we'll examine the components of a light microscope and their functions.

The Parts of a Light Microscope

A light microscope, whether a simple student microscope or a complex research microscope, has the following basic systems:

  • Specimen control - hold and manipulate the specimen stage - where the specimen rests clips - used to hold the specimen still on the stage (Because you are looking at a magnified image, even the smallest movements of the specimen can move parts of the image out of your field of view.) micromanipulator - device that allows you to move the specimen in controlled, small increments along the x and y axes (useful for scanning a slide)
  • Illumination - shed light on the specimen (The simplest illumination system is a mirror that reflects room light up through the specimen.) lamp - produces the light (Typically, lamps are tungsten-filament light bulbs. For specialized applications, mercury or xenon lamps may be used to produce ultraviolet light. Some microscopes even use lasers to scan the specimen.) rheostat - alters the current applied to the lamp to control the intensity of the light produced condenser - lens system that aligns and focuses the light from the lamp onto the specimen diaphragms or pinhole apertures - placed in the light path to alter the amount of light that reaches the condenser (for enhancing contrast in the image) Diagram of a typical student light microscope, showing the parts and the light path
  • Lenses - form the image objective lens - gathers light from the specimen eyepiece - transmits and magnifies the image from the objective lens to your eye nosepiece - rotating mount that holds many objective lenses tube - holds the eyepiece at the proper distance from the objective lens and blocks out stray light
  • Focus - position the objective lens at the proper distance from the specimen coarse-focus knob - used to bring the object into the focal plane of the objective lens fine-focus knob - used to make fine adjustments to focus the image
  • Support and alignment arm - curved portion that holds all of the optical parts at a fixed distance and aligns them base - supports the weight of all of the microscope parts The tube is connected to the arm of the microscope by way of a rack and pinion gear. This system allows you to focus the image when changing lenses or observers and to move the lenses away from the stage when changing specimens.

Some of the parts mentioned above are not shown in the diagram and vary between microscopes. Microscopes come in two basic configurations: upright and inverted. The microscope shown in the diagram is an upright microscope, which has the illumination system below the stage and the lens system above the stage. An inverted microscope has the illumination system above the stage and the lens system below the stage. Inverted microscopes are better for looking through thick specimens, such as dishes of cultured cells, because the lenses can get closer to the bottom of the dish, where the cells grow.

Advertisement

Light microscopes can reveal the structures of living cells and tissues, as well as of non-living samples such as rocks and semiconductors. Microscopes can be simple or complex in design, and some can do more than one type of microscopy, each of which reveals slightly different information. The light microscope has greatly advanced our biomedical knowledge and continues to be a powerful tool for scientists.

Lots More Information

Related HowStuffWorks Articles

Other Great Links

General Information

Tutorials and Virtual Microscopes

Organizations, Educational Information, Industry Resources