How a Cold Heat Soldering Iron Works

By: Tracy V. Wilson  | 
This is the original Cold Heat tool we took apart for this article. A new pro model is blue and use five AA batteries rather than four. ­

Key Takeaways

  • Cold Heat soldering irons operate differently from traditional soldering irons by instantly heating up and cooling down, allowing for quicker use without the wait times associated with conventional tools.
  • This technology relies on electrical resistance, similar to resistance soldering tools, to quickly heat the solder through a current passed between two probes.
  • Cold Heat tools simply employ established principles of resistance heating in a more affordable and accessible package.

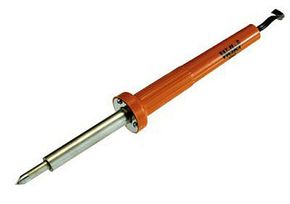
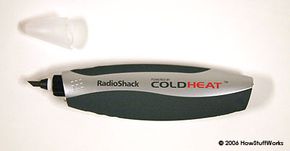
A Cold Heat soldering iron is a tool that seems to break the rules of soldering. As with other soldering irons, it melts solder -- an alloy that softens at a low temperature and hardens as it cools. Although solder (pronounced "soder") is commonly used to connect electronic components, you can also use it to make jewelry and stained glass. With the right type of solder, you can even repair metal containers, like pots and pans, or attach lengths of pipe to one another.

But while most soldering irons plug into a wall outlet, the Cold Heat tool uses batteries. Traditional irons get very hot and take a long time to cool off again, but the Cold Heat tool can heat up, melt some solder and cool off almost instantly. In one TV demonstration, someone uses the tool and then puts the tip on an inflated balloon -- the balloon doesn't pop.

Advertisement

To anyone who has­ burned a finger, damaged a table or melted a carrying case with a traditional soldering iron, the Cold Heat tool can seem pretty amazing. It's lightweight and portable, and it can cut down on the amount of time it takes to make small electronics repairs. On top of that, the Cold Heat tool doesn't come with the potential for serious injury or property damage. But reviewers -- professionals and average users -- either love the tool or hate it, and some people question whether it's really "new" at all.

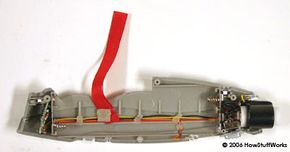
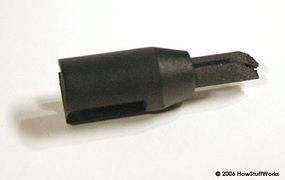
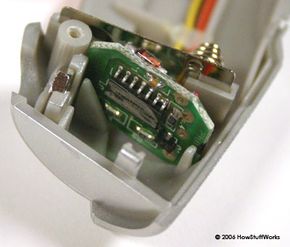
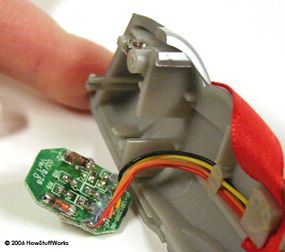
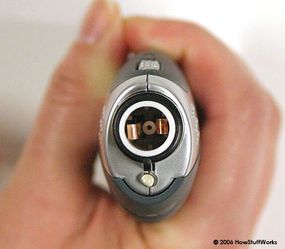
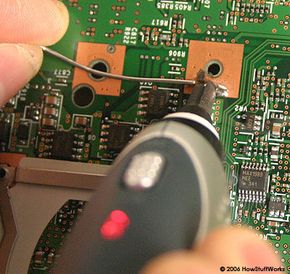
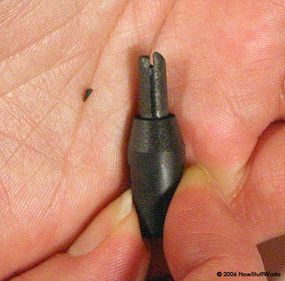
We wanted to know exactly how a Cold Heat tool works, so we took one apart. In this article, you'll learn Cold Heat's secrets, as well as what happened when we tried to use ours.

Advertisement

Joints and Irons: Soldering 101

A traditional soldering iron

One of the best ways to understand how a Cold Heat tool works is to examine how it's different from a traditional soldering iron. Electrical soldering irons usually have a resistance heating unit, similar to what you would find in a hair dryer or a toaster. Electrical current passes through the heating unit, and electrical resistance causes the unit to get hot.

It takes time for the heating unit to make the bit hot enough to use. It can also take a while for the bit to cool off again. This is partly because of the nature of heat itself. Heat is essentially a change in energy within an object. The heating unit warms the bit by passing energy into it. In the process, the bit's molecules begin to move faster and faster. As the bit cools off, it transfers heat into the air around it, and its molecules slow down again.

Advertisement

The amount of time required for the bit to cool off is also related to its emissivity. Emissivity is a measure of how efficiently a substance can transfer heat into its surroundings. The materials used in soldering-iron bits, such as copper, chrome and nickel, have a relatively low emissivity. In other words, they're not very efficient at releasing warmth into the air around them and cooling themselves off in the process.

A Cold Heat tool is different. Instead of plugging it in, waiting for it to heat up and waiting for it to cool off again, you just turn it on, touch the solder and go. To a casual observer, this is the incredible thing about Cold Heat.

But tools that do the same thing have been around for quite a while. They're called resistance soldering tools, and you can even get plans for making your own online. A resistance tool uses two probes that can look like rods, pliers or tweezers. These probes pass a current through the solder. The probes and the solder heat up very quickly because of their resistance to the current passing through them. Removing the solder breaks the circuit, and the tips cool off quickly.

The Cold Heat tool might look like magic -- some prominent explanations for how it works even feature magic -- but electrical resistance should get all the credit. The tool uses the same principles as a resistance soldering tool, but in a significantly less expensive package. We'll look at this in more detail next.

Advertisement

Resistance and Soldering

The Cold Heat tool's wires

Resistance is central to traditional soldering irons and to the Cold Heat iron. Electricity moves more easily through substances with lots of free electrons, like copper, than it does through substances with fewer free electrons, like carbon. In other words, substances like carbon have greater resistance. Moving current through substances with high resistance can create heat and sometimes light. This is the same principle that makes light bulbs work -- a light bulb has a resistive filament that gets hot and bright when current flows through it.

The heart of a Cold Heat tool is a broken circuit that travels from a few AA batteries to a tip that has two halves. The tip can look like one solid piece, but a dark insulating material keeps the two halves electrically isolated from one another.

Advertisement

A Cold Heat tip. The dark strip down the center is an insulator. Note that one half of the tip has broken.

When you turn the Cold Heat tool on, the switch closes a circuit that also includes a small light. This light lets you know that the tool is on. But a parallel circuit -- the one leading to the tip -- is still broken. This circuit remains broken until you put something conductive, like solder, in contact with both halves of the tip. The solder completes the circuit, also allowing current to pass through a second light.

Because of electrical resistance, both the solder and the tip heat up very quickly, and the solder melts. Dry skin doesn't conduct enough electricity to effectively complete the circuit, so the tip stays cool when you touch it.

We'll look at the circuitry and the tip in more detail in the next two sections.

Advertisement

Cold Heat Circuitry

The Cold Heat tool has a small circuit board next to the battery contacts.

We've established that the Cold Heat tool has pretty simple circuitry. The circuit that includes the power switch also includes a small light. A parallel circuit stays broken until both halves of the tip come into contact with a conductive material. A small light on this circuit lights up when it's complete, also.

The Cold Heat tool also has some electronic components beyond basic wiring. A small circuit board is at the end opposite the tip. This circuit board has two diodes, several resistors and a 14-pin integrated circuit. When both halves of the tip come into contact with solder, the chip routes power from the batteries through that branch of the circuit.

Advertisement

The flip side of the circuit board

So, when you turn the Cold Heat tool on, current flows from the negative pole of the batteries through a wire that leads to a small light. From there, it flows to the circuit board and then to the positive battery terminal. As long as solder isn't in contact with both halves of the tool's tip, that's the end of the process. Once you apply solder, the chip routes lots of power through the portion of the circuit that includes the tip. The electricity moves:

  1. From the circuit board to one half of the tip
  2. Through that half of the tip
  3. Through the solder
  4. Through the other half of the tip
  5. Back to the circuit board
  6. From the circuit board to the positive battery terminal, passing through another small light on the way
Metal contacts connect the wiring to the halves of the tip.

The tip is as important to the tool's abilities as the circuitry. We'll examine the tip, including what it's made of, next.

Advertisement

The Cold Heat Tip

Solder: burninated. Tip: broken.

The original marketing materials for the Cold Heat tool described its tip as a patented composite material known as Athalite. We suspect it's made from graphite (a form of carbon) or a substance primarily composed of graphite. Here's why:

  • It physically resembles graphite.
  • Carbon has 2,500 to 7,500 times the resistance of copper, so it can heat up quickly when exposed to electrical current.
  • Some resistance soldering systems use graphite for thicker probes.
  • The company has declined to identify the material, but it has said that it's natural and used in blast furnaces and the locomotive industry [Source: Seattle Post-Intelligencer]. Coal, which is mostly carbon, fits that description.
  • The Cold Heat tool's patents describe its tip as graphite. The patents also identify the insulator between the tip's halves as mica.

If the tip is really made from a patented compound, another company owns the patent for it. Hyperion Innovations, maker of the Cold Heat tool and owner of the patents describing it, does not own a separate patent for a compound material. In addition, the only patents that list Grigore Axinte -- inventor of the Cold Heat soldering iron -- as the inventor describe tools, not compounds.

Advertisement

Unfortunately, graphite can be brittle. One of the most common complaints in product reviews and message board posts is that the Cold Heat tip breaks during normal use. Unfortunately, using the recommended light pressure on the tip wasn't sufficient to complete a circuit when we tried to use the tool. Just after we successfully completed a circuit and melted some solder, our tip broke.

Our broken Cold Heat tip.

We have heard that some people love their Cold Heat tools. We suspect that they have the knack for using just the right amount of pressure at just the right angle, completing a circuit without shorting out any electrical components being soldered or breaking the tip.

For lots more information about soldering, electronics and related topics, check out the links on the next page.

Advertisement

Lots More Information

Related HowStuffWorks Articles

More Great Links

Sources

  • ColdHeat.com http://www.coldheat.com/
  • Cook, John. "Cold Heat Comes up with a Hot New Way to Solder." Seattle Post-Intelligencer, December 16, 2003. http://seattlepi.nwsource.com/business/152624_coldheat16.html
  • Krakow, Gary. "Cold Heat Soldering Iron Runs Hot and Cold." MSNBC, October 8, 2004. http://www.msnbc.msn.com/id/6151688/
  • Moon, J. "Cold Heat. Or Was It a Banana?" IGN, February 13, 2005. http://gear.ign.com/articles/590/590411p1.html
  • Resistance Soldering http://www.geocities.com/budb3/arts/meth/sldrrst.html
  • Svensson, Peter. "Cold Heat Soldering Iron." Globe and Mail, November 30, 2004. http://www.globetechnology.com/servlet/story/ RTGAM.20041130.gtcoldheatnov30/BNStory/TechReviews/
  • United States Patent & Trademark Office: Patent applications 20050247692, 20040149713 and 20020047001, patents 6797924 and 6646228
  • "Worst Soldering Iron Ever." NewTech, Inc, November 2005. http://newtechinc.blogspot.com/2005/11/ coldheat-worst-soldering-iron-ever.html

Advertisement

Loading...