One of the most common sights almost anywhere in the world is -- eyeglasses! Since we depend so much on the lenses inside those frames to improve our view of the world, you might wonder just what goes into creating them.
In this article, we will talk about how the eye focuses, how a lens works, how to read a prescription, and finally, how the lens is made, including the steps involved in grinding and shaping plastic lens blanks to fit an individual's prescription and frame.
Advertisement
Let's start with some vision basics.
Test your eyes
Try this interactive activity from Discovery Channel -- test your sight and learn how vision works at the same time. Other interactive segments let you explore your body's systems and see how they help you move smoothly through your daily life.
On the back of your eye is a complex layer of cells known as the retina. The retina reacts to light and conveys that information to the brain. The brain, in turn, translates all that activity into an image. Because the eye is a sphere, the surface of the retina is curved.
When you look at something, three things must happen:
Advertisement
The image must be reduced in size to fit onto the retina.
The scattered light must come together -- that is, it must focus -- at the surface of the retina.
The image must be curved to match the curve of the retina.
To do all that, the eye has a lens between the retina and the pupil (the "peep hole" in the center of your eye that allows light into the back of the eye) and a transparent covering, or cornea (the front window). The lens, which would be classified a "plus" lens because it is thickest toward the center, and the cornea work together to focus the image onto the retina. (For more information on how the eye functions, see How Vision Works.)
Definitions
Aberrations: ghost images, halos, waves or rainbows caused by imperfections in the curve or lens surface
Index of refraction: a ratio used to compare refractive power
Plus lens (+): a lens that is thickest at the center; moves the focal point forward
Minus lens (-): a lens that is thinnest at the center; moves the focal point backward
Focal point: a spot in space where refracted light meets; may be actual (plus lens) or assumed (minus lens)
Pupillary center: the point on a lens directly in front of the pupil
Astigmatism: a condition caused by a distortion in the cornea that creates an additional lens power
Advertisement
Out of Focus
Sometimes, for different reasons, the eye doesn't focus quite right:
The surfaces of the lens or cornea may not be smooth, causing an aberration that results in a streak of distortion called astigmatism.
The lens may not be able to change its curve to properly match the image (called accommodation).
The cornea may not be shaped properly, resulting in blurred vision.
Most vision problems occur when the eye cannot focus the image onto the retina. Here are a few of the most common problems:
Advertisement
Myopia (nearsightedness) occurs when a distant object looks blurred because the image comes into focus before it reaches the retina. Myopia can be corrected with a minus lens, which moves the focus farther back.
Hyperopia (farsightedness) occurs when a close object looks blurred because the image doesn't come into focus before it gets to the retina. Hyperopia, which can also occur as we age, can be corrected with a plus lens. Bifocal lenses, which have a small plus segment, can help a farsighted person read or do close work, such as sewing.
Astigmatism is caused by a distortion that results in a second focal point. It can be corrected with a cylinder curve.
In addition, lenses can be made to correct for double vision when the eyes do not work together ("crossed eyes"). The lenses do this by moving the image to match the wayward eye.
Corrective lenses, then, are prescribed to correct for aberrations, to adjust the focal point onto the retina or to compensate for other abnormalities. You can read more about vision problems in How Refractive Vision Problems Work.
Advertisement
How a Lens Works
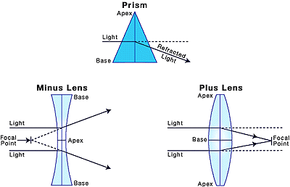
The best way to understand the behavior of light through a curved lens is to relate it to a prism. A prism is thicker at one end, and light passing through it is bent (refracted) toward the thickest portion. See the diagram below.
A lens can be thought of as two rounded prisms joined together. Light passing through the lens is always bent toward the thickest part of the prisms. To make a minus lens (above on the left), the thickest part, the base, of the prisms is on the outer edges and the thinnest part, the apex, is in the middle. This spreads the light away from the center of the lens and moves the focal point forward. The stronger the lens, the farther the focal point is from the lens.
Advertisement
To make a plus lens (above on the right), the thickest part of the lens is in the middle and the thinnest part on the outer edges. The light is bent toward the center and the focal point moves back. The stronger the lens, the closer the focal point is to the lens.
Placing the correct type and power of lens in front of the eye will adjust the focal point to compensate for the eye's inability to focus the image on the retina.
Advertisement
Determining Lens Strength
The strength of a lens is determined by the lens material and the angle of the curve that is ground into the lens. Lens strength is expressed as diopters (D), which indicates how much the light is bent. The higher the diopter, the stronger the lens. Also, a plus (+) or minus (-) sign before the diopter strength indicates the type of lens.
Plus and minus lenses can be combined, with the total lens type being the algebraic sum of the two. For example, a +2.00D lens added to a -5.00D lens yields:
Advertisement
Lens Shapes
Two basic lens shapes are commonly used in optometry: spherical and cylindrical.
A spherical lens looks like a basketball cut in half. The curve is the same all over the surface of the lens.
A cylindrical lens looks like a pipe cut lengthwise. The direction of a cylinder curve's spine (axis) defines its orientation. It will only bend light along that axis. Cylinder curves are commonly used to correct astigmatism, as the axis can be made to match the axis of the aberration on the cornea.
Definitions
Compound lens: a lens having both a spherical and a cylindrical component
Cylindrical curve: a curve that radiates along a straight line, like a pipe cut lengthwise
Diopter (D): the refractive power of a lens; the higher the number, the stronger the lens
Refraction: the bending of light
Spherical curve: a curve that is the same in all directions, like a basketball cut in half
Advertisement
Lens and Prescription
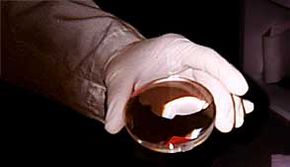
To make a lens, the first thing you need is a lens blank. Blanks are made in factories and shipped to individual labs to be made into eyeglasses. The raw lens material is poured into molds that form discs about 4 inches in diameter and between 1 and 1 1/2 inches thick. The bottom of the mold forms a spherical curve on the front face. A small segment with a stronger curve may be placed in the mold to form the segment for bifocals or progressive lenses.
How to Read the Prescription
Most prescriptions have four parts:
Advertisement
The base (spherical) strength and type (plus or minus)
The cylinder strength and type
The cylinder axis orientation (in degrees with 90 degree vertical; an "x" means "at")
The strength of bifocal segment ("plus" indicating "in addition") and type
A short form prescription from the optometrist or ophthalmologist might read:
2.25 -1.50 x 127 plus +2.00
This means:
A +2.25D spherical base curve (plus lens)
A -1.50D cylinder at 127 degrees (a minus cylinder lens is added to the base curve)
An additional bifocal segment of +2.00D
Total power of the lens with the cylinder is +2.25 + (-1.50) = +0.75D. At the segment, the power is (+0.75) + (+2.00) = +2.75D. And in case you've ever wondered, OD means right eye and OS, left eye.
Definitions
Base curve: a simple spherical curve; the primary lens curve
Lens blank: basic spherical lens; the lab grinds the back of the blank to match the prescription
Optical center: a spot on a spherical lens where light enters at a 90-degree angle to the lens plane
Segment: the portion of a lens added for reading (bifocal or trifocal); it may be added separately to the lens blank or formed as a blended curve onto the base
Advertisement
Overview: How the Lens is Made
In the lab the patient's full prescription gives these exact details:
The total power (in diopters) the finished lens must have.
The strength and size of the segment (if needed).
The power and orientation of any cylinder curves.
Details such as the location of the optical center and any induced prism that may be needed.
The lab technician selects a lens blank that has the correct segment (called an add) and a base curve that is close to the prescribed power. Then to make the power match the prescription exactly, another curve is ground on the back of the lens blank.
Advertisement
In most labs the equipment is designed to grind minus curves, so a strong, plus lens blank is usually selected.
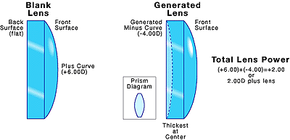
If the base curve is too strong, then a minus curve is ground in the back of the lens, which reduces the total power of the lens.
For example, a very common lens blank is +6.00 diopters. If the prescription calls for a total of +2.00 diopters, a -4.00 diopter curve is ground on the back: (+6.00D) + (-4.00D) = +2.00D. (See the illustration below.) If it is needed, the cylinder curve is also ground at the same time.
If the prescription calls for a minus lens, the +6.00 diopter lens blank can still be used. To create a lens with the strength of -2.00 diopters, a -8.00 diopter curve is ground on the back: (+6.00D) + (-8.00D) = -2.00D.
Advertisement
Making a Lens: Part 1
A lens blank will be groundto match the patient's prescription.
Steps 1 through 3
Corrective lenses can be made with glass or plastic, but nowadays, plastic is the most common. While several different types of plastic are used in making lenses, all of them follow the same general manufacturing procedures. Most of the steps outlined also apply to glass, although a few important differences are noted at the end.
A lab, even an automated one, follows 12 steps to make prescription lenses:
Advertisement
Step 1: The technician chooses a lens blank of the desired material with the proper base curve and, if needed, add power.
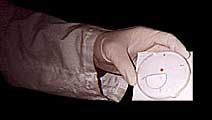
Step 2: If the prescription calls for a cylinder, a line is marked on the front of the lens to define 180 degrees, and then another line is drawn that matches the axis of the second curve. If there is a segment, the segment edge is used as the 180 degree line. Often the optical center of the lens is made slightly above the segment edge, and the line is marked the appropriate distance. (Note: When there is no segment or induced prism, the lens may be left unmarked and the cylinder axis determined after the lens is ground.)
A lens blank is marked to show where the cylinder axis will be.
Step 3: Since the front of the lens will be left as is, it is covered by a special tape to protect it.
The technician puts a protective covering over the front of the lens blank to keep it from being damaged.
Definitions
Generator: a compound surface grinder used to grind curves in the surface of the lens
Induced prism: a technique that moves the optical center away from the pupillary center
Advertisement
Making a Lens: Part 2
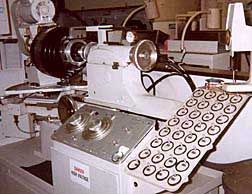
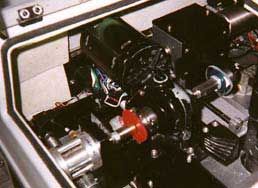
A compound grinder, called a generator, grinds the required curves into the back of the lens blank. The two large dials on the console set the spherical and cylindrical curves that will be ground into the lens.
Steps 4 through 6
Step 4: Depending on the type of equipment, the lens must be prepared to fit onto the generator, which is commonly a compound surface grinder capable of grinding two curves at once.
A chuck receiver (called a block) is placed on the front of the lens over the protective tape. If there is a cylinder curve, the lens is oriented so the cylinder axis matches the cylinder sweep axis of the generator.
Advertisement
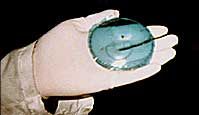
A chuck receiver, called a lens block, must be attached to the front of the lens so it can be mounted in the generator.
The center of the block will become the optical center of the lens. Depending on the equipment, the lens may be held in place by special adhesive pads, with a special alloy that "glues" the lens to the block or with plastic.
Step 5: The lens is inserted in the generator.
The lens blank, attached to the lens block, is inserted in the generator. The generator has pins that align the lens.
The lens might need other processing besides the compound curves produced by the generator, so the lens may also be tilted in the chuck. This tilt will offset the optical center (called induced prism) often used to allow thinner lenses or to accommodate special requirements of the prescription.
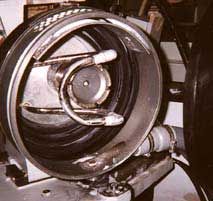
The lens is ground within a rubber-lined grinding chamber. The cone-shaped quill, or grinding wheel, is at the center. The quill has a diamond cutting surface along its outer edge and is angled so only the outside edge touches the lens.
Step 6: The curves are set on the machine and the lens is generated (ground). This step may either be fully automated or operated by hand, where the operator manually sweeps the quill (grinding wheel) across the lens, gradually advancing the lens until the desired lens thickness is achieved. Lens thickness is determined by curve type (plus or minus), lens material (some plastics are tougher and may be ground thinner), or other considerations (safety glasses, for instance, are made thicker than lenses for everyday use). If the lens gets too hot during the operation it may warp or tear, so it is cooled by water, which also washes away the cut material (called scarf).
Advertisement
Making a Lens: Part 3
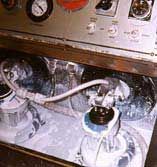
A cylinder machine can sand two lenses at the same time. Air pressure holds the lens and the sanding block together, and a timer switches the machine off at a preselected time.
Steps 7 through 9
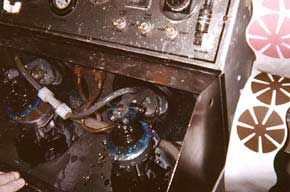
Step 7: The lens is taken off the generator and placed in a special sanding machine (called a cylinder machine) to remove any marks left by the generator. To do this, sandpaper is glued to a block with reversed, matching curves (a +2.00 base/+2.50 cylinder, for example, to match -2.00/-2.50 generated curves), and the lens and block are rubbed together. Meanwhile the lenses are kept cool and cleaned with water.
Following the sanding operation, the lenses are polished on an identical machine, except that felt polishing pads washed with polishing compound are used instead of sandpaper and water. When this step is completed, the lens is optically clear without visible scratches.
Advertisement
After sanding, the lenses are polished so they are perfectly clear without any scratches. Liquid polish flows over the lenses and into a reservoir to be recirculated.
Step 8: The block is removed from the lens, and the lens is washed and inspected. Sometimes special coatings may be applied to the lens. At this point the lens blank has had additional curves ground in the back of the lens and it has been polished. However, the large diameter blank still has to be sized and shaped to fit into the frame selected by the patient. Several methods are used, depending on the equipment, but they are all based on the following description.
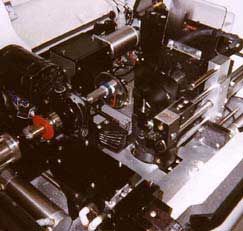
Step 9: The lens blank is shaped on a linear lathe (called an edger) using either a ceramic or diamond grinding wheel or stainless steel blades. The lens must again be prepared to accept a chuck, but since only the edge is being cut, a much gentler system is used. A small chuck receiver is placed where the geometrical center of the finished lens will be, and the lens is then oriented on the 180 axis. Usually, only an adhesive pad is needed to hold the receiver on the lens. The lens is chucked in the edger and held in place by a pressure pad that presses on the opposite side of the lens (like holding a very large coin between your thumb and forefinger at its center).
The lens is mounted into an edger. The edger's chuck turns slowly as the lens is cut to shape.
Advertisement
Making a Lens: Part 4
Frame patterns
Steps 10 through 12
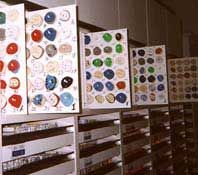
Step 10: A pattern in the shape of the frame is inserted in the edger. Patterns are commonly plastic and may be supplied by the frame manufacturer or made in the lab.
A red pattern is used in the edger to determinethe final shape of the lens.
Newer edgers do not use patterns; instead, the shape is determined by a probe that measures the frame and stores the information in a computer, which in turn controls the edging operation. As it operates, the slowly turning lens is brought into the fast turning cutting surface, which is either a grinding wheel or steel blades, until a guide contacts the pattern, which is rotating to match the lens. If the frame has a complete rim surrounding the lens, a bevel, or ridge, is cut along the edge of the lens that will fit into a groove in the frame; otherwise, the edge is left flat.
Step 11: The lenses, now cut to fit the frame, are prepared for inserting into the frame.
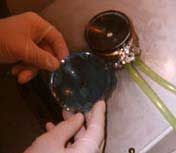
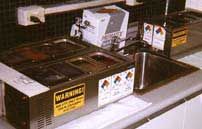
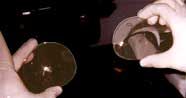
If the lenses are to be tinted, the dyeing is done at this point. Special dyes are kept in heated containers and the lenses are immersed. The density of the tint is determined by how long the lenses are left in the dye. Lenses may be only partially tinted (fade), tinted different colors at top and bottom, or tinted a custom color by combining different colors. Also, special UV blocking dyes may be applied in the same way.
Lenses that need to be tinted are dipped in hot dye.
If the frame is rimless, a groove is cut along the edge of the lens to receive the string that holds the lens to the frame. Any sharp edges are trimmed and smoothed and, if desired, the edge is polished on a buffing wheel.
Step 12: The lens is inserted into the frame. Fit and orientation is double checked, any worn screws or hinges are replaced as needed, and the frame is made square. The finished eyeglasses are then thoroughly cleaned and packaged for delivery to the patient.
A technician checks the finished lensesfor scratches and imperfections.
Glass lenses are ground and polished much the same way as plastic except that diamond cutting surfaces are used, and some details may vary. The blanks are made of relatively soft glass and must be tempered, either by chemicals or heat, to strengthen them before inserting into the frame.
Advances in automation are rapidly changing how lenses are made. For example, the vast majority of labs now use computers to determine curve parameters and lens choice, and equipment is available that will combine several steps or even do the entire operation automatically.
For more information about corrective lenses and related topics, check out the links on the next page.
Frequently Answered Questions
What is normal eye strength?
Normal eye strength is considered to be 20/20 vision, or the ability to see clearly at a distance of 20 feet.
Bob Broten is an American Board of Opticianry-certified optician and certified laboratory technician at Lenscrafters Inc. in Portland, Oregon. He holds a bachelor's degree in biology and did extensive research in fish vision while pursuing his degree.
Author's note: I am indebted to Erik Schopp, A.B.O-certified optician and general manager of Lenscrafters #671, and Dr. Dawne R. Griffith, O.D. with Dr. Robert D. Forbes & Associates, for their invaluable assistance in reviewing this article. Optics and optometry are complex subjects beyond the scope of this article. In presenting the basic principles of these two disciplines, I've oversimplified somewhat for the sake of brevity. For this I apologize. Any errors in fact or theory are entirely mine. I encourage interested readers to seek professional advice, as this article is a brief overview and not intended as a guide to diagnoses. Also, I am grateful to Lenscrafters store #671 in Portland and to Joshua Boyd, lens technician, for help in taking the photos used with this article.
Cite This!
Please copy/paste the following text to properly cite this HowStuffWorks.com article: