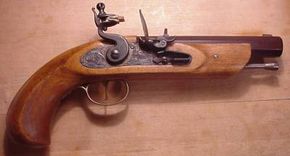
If you have ever studied American history, you are sure to have heard about the flintlock. The flintlock mechanism was the first reliable and relatively inexpensive system for firing a gun, and was hugely popular in colonial America. It was first developed in the mid-1500s and spread until, by 1660, the English Army adopted the flintlock system for its "Brown Bess" guns. The Brown Bess became famous because of its widespread use during the American Revolution. The flintlock remained popular until the mid-1800s, when it was replaced by the percussion-cap lock. By the time of the civil war, nearly all guns manufactured used the percussion cap. That means that the flintlock, as a technology, lasted about 300 years!
The flintlock gun and the flintlock itself are fascinating devices. There are at least four things that make them so interesting:
Advertisement
Next to the pendulum clock, the flintlock gun was probably the most technologically advanced device that anyone commonly owned at the time.
The flintlock is incredibly important historically. Colonial America depended on it for food, protection and warfare.
The flintlock itself is amazing from a mechanical standpoint.
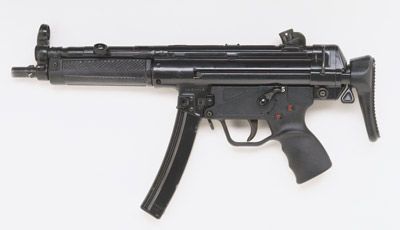
The flintlock is the foundation of all modern guns. If you want to understand how modern guns work, you get the best view by understanding the flintlock. A flintlock gun is the simplest reliable gun possible, and it can teach you a great deal about the technology behind guns in general.
In this edition of HowStuffWorks, we will look at the flintlock itself as well as the guns that used it so that you can completely understand how it works. In the process, you will learn some amazing things about this important device!
Guns have been around for an incredibly long time, and they started with the cannon. The World Book encyclopedia discusses the first significant use of a cannon at around 1350 AD, making it one of the oldest pieces of modern technology still in use.
A cannon is a remarkably simple device. It consists of a strong metal tube with a plug at one end. There is a small hole for a fuse drilled through the tube. You load gunpowder into the tube from the open end of the cannon and then insert a cannon ball so that the gunpowder and ball are pressed against the plugged end. You stick a fuse in the small hole and light it to ignite the gunpowder (or you can pour a little gunpowder in the hole and light the gunpowder instead of using an actual piece of fuse). The explosion shoots the cannonball away from the cannon at high speed.
Advertisement
The first guns were essentially hand cannons -- small tubes that the user loaded with gunpowder and a ball and lit from the outside. Around 1400, hand cannons were fairly common, and people were even using four-barrel hand cannons! You loaded each little cannon separately and lit each one when you needed it.
The hand cannon required two technological improvements to make it into a useful tool:
First, it needed a shape that worked for the shooter -- the early hand cannons were essentially sticks that the shooter held in his or her hand.
There had to be a good way to light the gunpowder quickly. Wouldn't it be nice if you could fire the gun at the touch of a button (trigger)? It is interesting to think of the early guns as the first button-operated appliances!
A lock is the ignition mechanism for a gun, and several locks preceded the flintlock. For example, the matchlock was simply a piece of slow-burning rope that you would light ahead of time and then move into position to light the gunpowder. The slow-burning rope was attached to a lever that you moved with your finger to rotate it into position -- the first trigger. Obviously, the matchlock had several problems:
You had to light the rope ahead of time.
The rope could burn itself out if you took too long between lighting it and firing the gun.
It glowed, so people could see it at night.
Rainy weather would put it out.
Despite these problems, matchlocks were common for 200 years because they were a better option than lighting the gunpowder by hand and they were cheap to build.
What the world needed was a way of igniting gunpowder in the barrel of a gun that was instant, reliable and fairly weatherproof. It also needed to be relatively inexpensive and easy to make. The flintlock was the technological marvel that solved all of these problems!
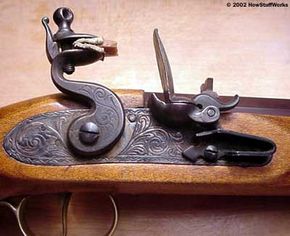
The Flintlock Mechanism
The flintlock
The Merriam Webster Dictionary describes a lock, in the context of a gun, as "The method for exploding the charge or cartridge of a firearm."
The flintlock is the most venerable of the lock technologies. The flintlock mechanism, like the pendulum clock mechanism, is amazing from an innovation standpoint. This single device solved so many of the problems of the time, and it did so using the fairly primitive tools and technology already available then. The flintlock was quite an accomplishment!
Advertisement
The basic goal of the flintlock is simple: to create a spark that can light the gunpowder stored in the barrel of the gun. To create this spark, the flintlock uses the "flint and steel" approach. The idea behind flint and steel is straightforward. Flint is an amazingly hard form of rock. If you strike iron or steel with flint, the flint flakes off tiny particles of iron. The force of the blow and the friction it creates actually ignites the iron, and it burns rapidly to form Fe3O4. The sparks that you see are the hot specks of iron burning! If these sparks come near gunpowder, they will ignite it.
The flintlock therefore needs:
A piece of flint
A piece of steel
A place for the sparks to touch gunpowder
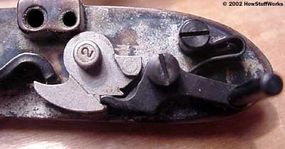
The flint needs to move at high speed and strike the steel in such a way that the sparks fall into some gunpowder. You can see the four parts that make this happen in the picture below.
The main parts of a flintlock are:
The hammer, which holds and accelerates a piece of flint
The mainspring, which powers the hammer
The frizzen, which is the piece of steel the flint strikes
The pan, which is the place where a small quantity of gunpowder waits to receive the sparks
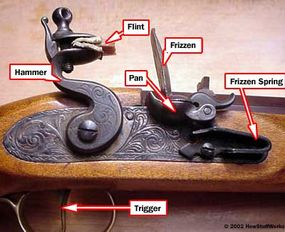
You can see these parts labeled in the picture below.
These four pieces are all that the flintlock actually needs to accomplish its goal, but all flintlocks also solve the problems of loading the pan, protecting the pan from the weather and triggering the hammer, so there are three additional parts:
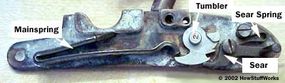
The tumbler, which holds and releases the power of the mainspring and transmits it to the hammer
The sear and sear spring, which engage the tumbler and release it when someone pulls the trigger
The frizzen spring, which holds the cover attached to the frizzen over the pan to make the flintlock weatherproof
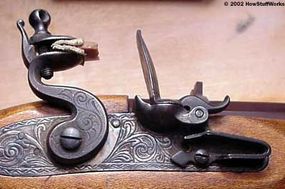
The mainspring presses against the tumbler and is able to rotate the hammer with a great deal of force. The sear engages the tumbler when the gun is cocked and holds the force of the mainspring. When you pull the trigger, it pushes the sear enough to release the tumbler and allows the hammer to drive the flint forward. You can see all of these parts in the image below.
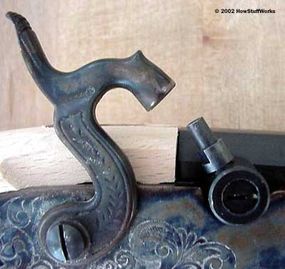
The back of the flintlock
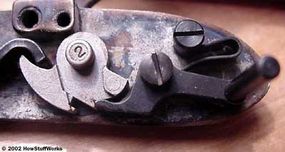
When you work with a flintlock and watch a flintlock in action you can see how all of these pieces work together. A flintlock has three positions for the hammer: uncocked, half-cocked and fully cocked.
In the fully cocked position, the gun is ready to fire. If the trigger moves the sear just a bit, it releases the tumbler. In the half-cocked position, you can load the gun. The trigger is locked in the half-cocked position and cannot release the tumbler. After you fire the gun, it is in the uncocked position. The following images show you these three positions from both sides of the lock, which allows you to understand how the sear and tumbler work together:
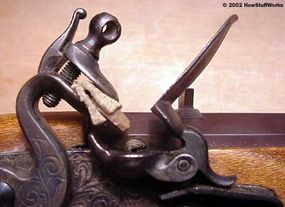
The flintlock in the uncocked positionThe flintlock in the uncocked position
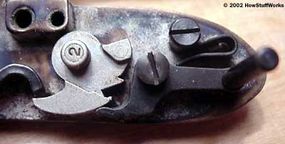
Note how the shape of the tumbler locks the half-cocked position:
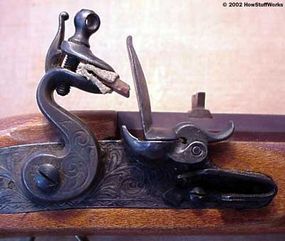
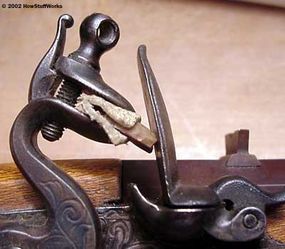
The flintlock in the half-cocked positionThe flintlock in the half-cocked positionThe flintlock in the fully cocked positionThe flintlock in the fully cocked positionThe frizzen at the flint's point of impact
In addition, the frizzen has the ability to move. In the cocked position the frizzen is down, covering the pan. When the flint strikes it, the frizzen pops out of the way to expose the pan. The frizzen spring holds the frizzen in both positions.
To use a flintlock, you follow these steps: (see the links at the end of this article for much more detailed instructions):
Half-cock the hammer.
Pour a measure of gunpowder down the barrel.
Wrap a lead ball (the bullet) in a small piece of cloth or paper and ram it down the barrel on top of the gunpowder. The bullet/cloth combination will have a nice, tight fit.
Place a small amount of gunpowder in the flintlock's pan.
Snap the frizzen in place over the pan.
Fully cock the hammer.
Pull the trigger to fire the gun.
When you fire the gun, the flint strikes the frizzen and shaves off iron to create sparks. The hammer's blow also snaps the frizzen back to expose the gunpowder in the pan. The pan's gunpowder ignites, and it flashes through a small hole in the side of the barrel to ignite the gunpowder inside the barrel. The gun fires!
Videos!
These three videos let you see and hear the flintlock in action:
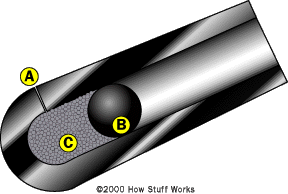
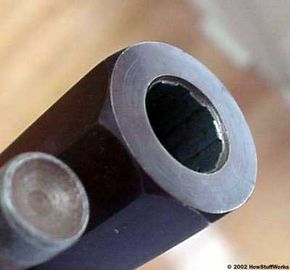
The Barrel
You can see the spiral grooves cut into this barrel.
The barrel of a flintlock is its own technological marvel, especially for the time. A blacksmith would take a flat piece of iron and beat it into a cylindrical shape around a mandrel -- a long rod of the proper diameter. By heating the iron to a high enough temperature in a forge, the blacksmith actually welded the seam along the length of the barrel to form a strong tube. This process could take days. Barrels ranged anywhere from pistol length (6 to 12 inches, 15 to 30 cm) to long gun length (40 to 60 inches, 102 to 152 cm).
The blacksmith could finish the interior of the barrel as either a smooth bore or a rifled bore. A smooth bore is just that -- smooth along the entire length of the barrel. The Brown Bess of the American Revolutionary War was smooth bored. So is any shotgun. Drilling out the tube with successively larger bits and then polishing with a reamer creates a smooth bore barrel.
Advertisement
Rifling a barrel is a way of increasing the accuracy of the bullet, whether the bullet is spherical or cone shaped. To rifle a barrel, you start with a smooth bore and engrave spiral grooves down the inside of the barrel. A typical pattern is one twist of the grooves in 48 inches (122 cm) of barrel length. As the bullet speeds down the barrel it engages the grooves, exiting the barrel with a rapid spin (between 1,000 and 3,000 RPM) and traveling at a speed of 1,000 to 2,000 feet per second (305 to 610 meters per second) through the air.
Once the barrel is smoothed or rifled, one end is closed off with a breech plug. Then, a small hole is drilled in the barrel to allow the flame from the flintlock's pan to enter the barrel and ignite the charge.
The Complete Gun
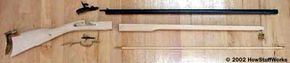
Lock, stock and barrel
The expression "lock, stock and barrel" goes way back, and is directly related to the manufacture of guns. To assemble a complete gun you need all three parts:
The lock - the firing mechanism (along with the trigger)
The stock - the wooden parts of the gun that give it its shape and make it easy to hold
The barrel - smooth bore or rifled (complete with breech plug)
If you have all three parts, you can assemble a complete gun. In colonial America, a person wanting a gun might have gone to a gunsmith for a complete firearm, or might have purchased the barrel and lock and created the stock him- or herself.
Advertisement
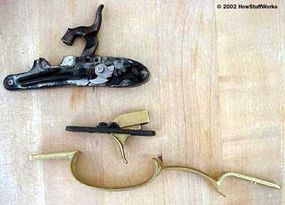
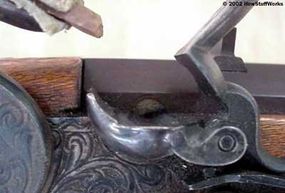
A percussion lock (see next page) with the trigger and the trigger guard
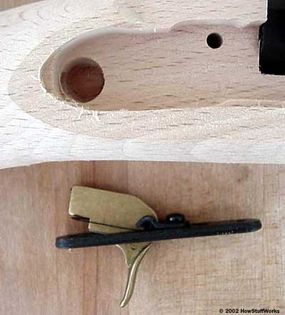
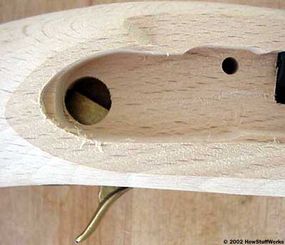
The stock is a fairly intricate piece of carving. It has to accept the barrel, the lock, the trigger and the trigger guard. In the following two pictures you can see the necessary woodwork, and you can also see how the trigger and the lock fit together in the stock.
The trigger ready to fit into the stockThe trigger in the stock
When you pull the trigger, the piece of metal within the stock pushes upward against the sear pin and releases the tumbler so the hammer falls.
A complete gun also included several decorative brass fittings for the nose and the butt of the gun, as well as a ramrod and a ramrod holder underneath the barrel.
The main challenge in assembling the gun, besides the obvious woodworking talent necessary to carve the stock, is getting everything to line up. The barrel has a hole in its side and the pan of the flintlock must align perfectly with it.
The hole in the barrel is tiny. It is hard to see in the picture above, but it is in the middle of a screw-in piece of this modern flintlock reproduction.
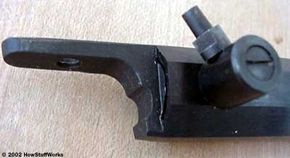
The Flintlock's Replacement: Percussion Cap
The nipple attached to the end of the barrel
A percussion-cap lock in an unfinished stockThe percussion hammer in the cocked position: The cap, about the size of a pencil eraser, fits over the end of the nipple.The percussion hammer in the uncocked position
Flintlocks lasted a remarkably long time, but they were eventually replaced by a lock and ignition system called the percussion cap. The percussion cap was easier to load, more weather resistant and more reliable, so by the time of America's civil war, both Union and Confederate armies used percussion-cap guns exclusively.
The percussion cap was made possible by the discovery of a chemical compound called mercuric fulminate or fulminate of mercury. Its chemical formula is Hg(ONC)2 -- it is made from mercury, nitric acid and alcohol.
Advertisement
Mercuric fulminate is extremely explosive, and it is shock sensitive. A sharp blow, or even too much finger pressure, can cause it to detonate. By putting a small amount of mercuric fulminate in a pre-made cap (a tiny cup about the size of a pencil eraser) and affixing the cap to a nipple and tube leading into the barrel, the cap can ignite the gunpowder in the barrel.
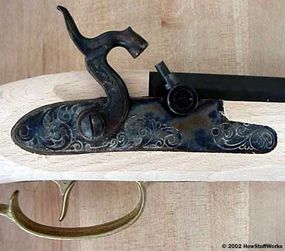
The transition from flintlock to percussion cap is very minor, and many flintlocks were converted. The percussion lock is exactly the same as the flintlock in terms of the mainspring, hammer, tumbler, sear and sear spring. The hammer has uncocked, half-cocked and fully cocked positions just like the flintlock.
What the percussion lock does not have is the flint and frizzen. Instead, there is a nipple that accepts the cap, and this nipple contains a tube that leads the flame from the cap down to the main charge of gunpowder in the barrel. The hammer is shaped to strike the cap on the nipple and cover it so the nipple does not get blown off. These pictures help you understand the percussion lock:
The percussion lock did not last very long -- perhaps 50 years. Manufacturing processes were developing rapidly at the time and it became possible to integrate the cap, powder and projectile into a single metal package at low cost. These bullets are what we use today!
For lots more information on flintlock guns and other weapons, check out the links on the next page.