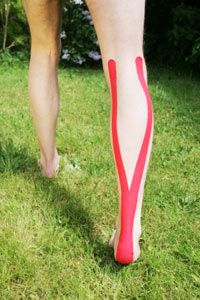
Before you attempt taping, get informed. Even if you're familiar with the muscles you're treating, applying the tape incorrectly could do more harm than good.
1. Get Professional Guidance
Dr. Kase's book contains instructions and thorough illustrations for taping everything from the scalenus anterior in the neck to the flexor hallucis brevis in the foot. Kinesio Taping experts, like athletic trainer Carrie Hendrick, Ph.D., of Asheville, N.C., recommend visiting kinesiotaping.com and finding a Certified Kinesio Taping Practitioner (CKTP) in your area.
To become a CKTP, Hendrick trained at two seminars given by the Kinesio Taping Association International (KTAI) and successfully completed an online exam. CKTPs and other experienced taping experts often give talks and demonstrations on taping at health and fitness expos around the world [source: Hendrick].
2. Choose the Right Tape
Next, select your kinesiology tape. Dr. Kase recommends that the elasticity of tape used in Kinesio Taping has a stretch potential between 130 and 140 percent of its original length. The Kinesio brand tape has a certain amount of stretch to it even before you remove the paper backing. Expect a five to 10 percent stretch in Kinesio Tape when you apply it gradually, rolling off the paper as you go.
When shopping for other brands of kinesiology tape, look for similar percentages of potential stretch.
3. Cut the Tape
Prior to placement, you need to cut your tape to the correct length and shape. A straight cut, perpendicular to the length of the tape, creates an "I" strip. Other cuts include "X," "Y" and "fan" shapes.
The instructions for the specific muscle group you're treating indicate the shape you'll need and how to cut it. To measure the proper length, simply hold the tape up to the area you're taping.
4. Prep the Skin and Peel the Tape
When you're ready to make contact, clean the skin of dirt, oils and lotions to maximize adhesion. Then, go back to those instructions for information on how to peel the back off based on the shape of the tape and proper technique for applying it.
One tip is that if you have to peel off the backing all at once, do so slowly to make sure the lightweight strip doesn't fold back on itself.
Another pointer: If you have to stick the tape in a temporary position, don't press or rub the tape at that spot — you'll activate the adhesive and make it difficult to move to its final position.
5. Choose the Tape Direction
Dr. Kase describes the two directions you can apply the tape and the importance of choosing the correct direction:
- For muscles that are injured or overused, needing relief and healing from pain and tightness, apply the tape with no tension, starting from the tendons that hold the muscle to the bone and extending toward the origin of the muscle.
- For chronically injured or weakened muscles needing support and full range of motion, apply the tape with light tension, starting from the origin of the muscle and extending toward the tendons that hold the muscle to the bone.
When you've placed the tape in its final position, rub the tape for a few seconds to activate the adhesive and ensure it stays put. After an hour, the adhesive sets and seals, and should be adhered enough to stay put for three to four days through all your daily activities, including exercise and showering.


