Bread is a staple food made from flour, water and yeast or sourdough starter, mixed and baked into a dough.
It has been a dietary staple for thousands of years, with various types of bread existing across cultures and regions.
Bread serves as a versatile food item, offering a source of carbohydrates, fiber and nutrients in diets worldwide.
You probably eat bread every day. You may even know how to make your own bread. But have you ever thought about bread as a technology?
Why do we have bread? That's a great place to start. We could just as easily munch on dry wheat kernels instead. Or we could grind the wheat into flour, mix the flour with water and eat it as a wet mush. Or we could pour the mush out on a table and dry the mush into thin brittle sheets. But we don't do that, mainly because bread tastes a lot better, and it also works a lot better for sandwiches. Bread is moist (not wet like mush or dry like dried mush), soft (unlike wheat kernels), spongy and delicious. Bread is a bio-chemical technology for turning wheat flour into something tasty! In this article, we will examine the technology of bread in detail.
If you pick up a slice of bread and examine it closely, you can see that it is full of air holes. This makes it spongy and soft. You will also see that bread is moist. If you let a slice of bread sit out on the counter for a day, you will realize just how moist fresh bread is!
Bakers use two simple facts of life to create soft, spongy, moist bread:
Advertisement
First, they use the fact that yeast (a single-cell fungi) will eat sugar, and from the sugar create alcohol and carbon dioxide gas as waste products. The carbon dioxide gas created by yeast is what gives bread its airy texture, and the alcohol, which burns off during baking, leaves behind an important component of bread's flavor.
Second, wheat flour, if mixed with water and kneaded, becomes very elastic. The flour-and-water mixture in bread becomes stretchy like a balloon because of a protein in wheat known as gluten. Gluten gives bread dough the ability to capture the carbon dioxide produced by yeast in tiny flour balloons.
You can perform a few experiments to better understand how bread works.
Advertisement
Experiment 1
One thing you'll learn in this experiment is that yeast does, in fact, produce carbon dioxide gas. To perform this experiment, you will need:
One large Ziploc-type freezer bag - The plastic bag should be able to hold between a couple of quarts to a gallon of water. (Usually the box that the bag comes in will state the bag's capacity.)
One envelope of "rapid-rise, active, dry yeast" from the grocery store
1 cup (.24 L) lukewarm water (about 100 degrees F, 37.7 C) - When you stick your finger in it, it should feel neither warm nor cold.
1/2 cup (.12 L) sugar
Let's get started!
Advertisement
Take the 1 cup lukewarm water and mix the package of yeast into it. When you pour the yeast granules into the water, you allow the yeast cells to become active.
Mix in your sugar.
Pour the entire water-sugar-yeast mixture into the plastic bag. Push as much air as possible out of the bag and then seal it tightly shut.
Put the plastic bag in a warmish place (see this section to find out how to turn your oven into a warmish place). Come back in about an hour.
When you come back to your experiment, you'll notice that yeast cells do a really good job of creating carbon dioxide. You will see that the bag has partially filled with the gas, and that the liquid is full of carbon dioxide bubbles that the yeast has produced. A yeast cell can process approximately its own weight of glucose (sugar) per hour, and from the glucose (C6H12O6), yeast produces carbon dioxide (CO2) and ethanol (C2H5OH) (two molecules of each). Although yeast cells are small, there are billions of them available from the packet of yeast. You should be able to see a noticeable amount of puffiness in your bag after two hours. You may want to go to bed and let the bag sit overnight -- it will get quite puffy if you let it.
Advertisement
Experiment 2
Now, let's see what happens if we change things around a bit.
Reproduce experiment 1, but this time replace the 1/2 cup sugar with a 1/2 cup (.12 L) white flour.
Mix the flour thoroughly into the water so there are no lumps. (This is most easily done by mixing the dry flour with a small amount of water to create a paste, then adding a little more water, and so on until all the water has been added.)
Seal the flour-water-yeast mixture in a plastic bag as you did in Experiment 1 and come back in an hour or two.
What you will notice is that this mixture produces carbon dioxide, but somewhat more slowly. (If you run Experiments 1 and 2 simultaneously, you will be able to see the different rates more easily.). Where did the sugar for the yeast to eat come from in Experiment 2? We didn't put any sugar at all in this bag, right? It turns out that, in the mixture of flour and yeast, there are enzymes that turn the starch in the flour into maltose, another sugar. The yeast uses this sugar in the same way it uses the glucose in white sugar. It takes time for the enzymes to convert starch to maltose, and that's what causes the delay. However, the yeast is able to produce some carbon dioxide, and that's how you know the enzymes are working. In a loaf of bread, it is this flour-to-maltose reaction that actually drives the expansion of the bread for the most part -- the small amount of sugar you mix into the bread dough is used up by the yeast fairly quickly.
Advertisement
Experiment 3
From the previous two experiments, you can see that yeast cells produce plenty of carbon dioxide. The reason why bread bakes up so airy is because the bread dough captures and holds the carbon dioxide that the yeast produces. It does this because flour contains a protein called gluten. To see gluten in action, try this experiment:
Mix 1/2 cup water and 1/2 cup flour in a bowl.
Stir the mixture with a fork to wet the flour. What you will have initially is a lumpy, grainy mass.
Lift the fork out of this mass. You will find that the mass is quite watery.
Now keep stirring for about five minutes (set a timer for five minutes -- it is a long time when you are stirring!). Over time, the batter will smooth out.
Keep stirring, and a funny thing will happen when you lift the fork slowly from the bowl: The batter will have become quite elastic! Not elastic like a rubber band, but elastic enough that you'll be able to pull away up to a 1-inch-long thread of batter with the fork. This mixture is now extremely smooth and not watery at all.
That elasticity is caused by the gluten in the flour. Gluten is a protein that forms thread-like chains. By stirring (or more commonly, kneading) the dough, the gluten develops into long, interlaced chains. Kneading is better for developing these chains because kneading is gentle -- it does not cut the chains up. When you knead bread dough, you are creating gluten chains. If you were to skip the kneading part, your bread would not rise very well -- all the carbon dioxide in the yeast would bubble up to the top and escape, rather than being captured inside the elastic dough.
Advertisement
Let's Bake!
Mixing the ingredients
By now, you understand a whole lot more about the technology of bread!
You know that the bubbles in the dough come from yeast, and that enzymes convert flour's starch into maltose, which the yeast eats to produce the carbon dioxide.
You know that the gluten in the flour helps the dough capture the carbon dioxide and hold it in mini gluten-balloons.
You also know that the yeast produces alcohol. The combination of the maltose and alcohol explains why bread tastes a lot better than flour mush!
So, let's bake some bread and try it out! To make one loaf, you'll need:
Advertisement
3-1/4 cups (.78 L) flour, separated into two 1-1/2 cup (.36 L) and one 1/4 cup (.06 L) batches
1 cup (.24 L) lukewarm milk (warm it in a microwave)
1/8 cup (.02 L) water
1 tablespoon (15 mL) sugar
1 envelope active dry yeast
1 teaspoon (5 mL) salt
1 tablespoon vegetable oil
1 loaf pan (or cookie sheet)
An oven
Here we go...
Dissolve the yeast in the water and let it sit for 10 minutes or so to "come back to life" (you will likely notice it foaming slightly -- that is a good sign -- it tells you your yeast is okay).
In a big bowl, combine the water/yeast, milk, sugar, salt and oil.
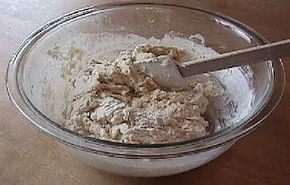
Add 1-1/2 cups of your flour and start stirring until well blended.
Stir in the other 1-1/2 cups of flour. At this point, the dough will be pretty stiff but still sticky.
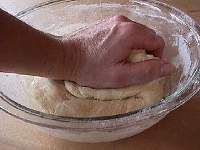
Now, you need to knead the dough for about 10 minutes. Start by washing your hands.
Since the dough is sticky, dust the top of it with about 2 teaspoons of the flour you saved.
Get your hands into the bowl with the ball of dough and squeeze it, push it, mash it, etc. This is kneading, and it's hard work, by the way, but you have to do it to develop the gluten. Stick with it for 10 minutes (set a timer if you need to). Kneading the dough
When the dough gets sticky again, dust it with some more flour. You may have to use more than the original 3-1/4 cups flour, and that's okay. Your hands may get covered with sticky dough. "Wash them" with dry flour. That is, when your hands get sticky, dust them and the top of the dough ball with flour.
Over time, an amazing thing will happen -- the dough ball will stop being sticky, and will become satiny smooth and elastic.
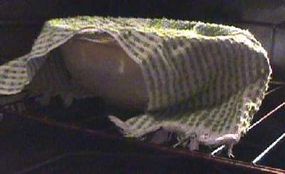
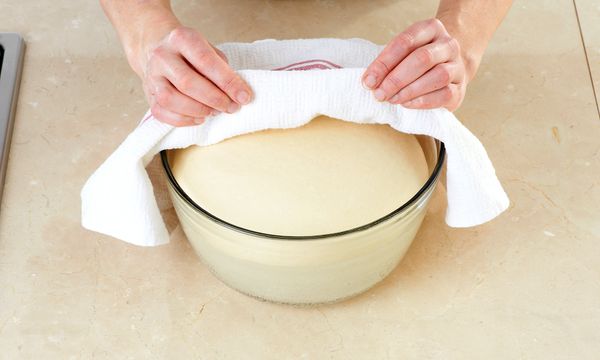
Now, you need to let the dough rise in a warm place for between 60 and 90 minutes. The easiest way to create a warmish place is to turn your oven on to its lowest setting possible (around 150 F/ 65.5 C), let it heat up to that temperature, then turn the oven off and open the door of the oven wide for about 30 seconds to dissipate some of the heat. Rub the 1 tablespoon of vegetable oil onto the top of the ball of dough to prevent drying, and then stick your bowl of dough inside the oven and close the door. Traditionally, you cover the bowl with a towel, also to keep the dough from drying out. Look in periodically.
After about 60 to 75 minutes, your dough ball will have nearly doubled in size. The gluten and the carbon dioxide that the yeast produced worked!
Letting the dough rise in the oven
Take the bowl out of the oven. The dough will be sticky again, so wash your hands and this time rub a little oil on them.
"Punch the dough down," which is baking-speak for pushing all the air out of the dough with your hands.
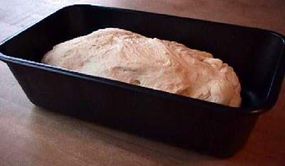
Take the dough out of the bowl. If you have a loaf pan, grease the pan, shape the dough into a small loafish shape and put it in the pan. If you are using a cookie sheet, either shape the dough into a ball or a loafish shape, and place it on the sheet.
Put the dough back in the warm oven and let it rise again for anther 60 to 90 minutes -- it will double in size again.
Letting the dough rise a second time in the pan
When your dough has again doubled in size, turn the oven on to 350 degrees F (176 C), and cook the bread for about 45 minutes. You will know it is done when the loaf has a nice golden-brown color and when you tap on the top crust, the tap sounds hollow.
Take your loaf of bread out of the oven -- don't forget to turn off the oven! Let the bread cool for a minute so you can get it out of the pan. Then cut off a slice and enjoy the miracle of fresh-baked deliciousness! You are tasting the great biological and chemical masterpiece called bread!
Advertisement
Bread Q&A
Here's a set of questions from readers.
Q: Why does bread need to rise twice? A: You let bread rise over several hours to develop its flavor. The longer the yeast cells have to work (up to a point), the more maltose and alcohol they can produce.
Q: Why does bread need to rise in a warm place? A: Yeast cells are like most single-cell organisms -- they are more active when it is warm. The whole idea behind a refrigerator is to make food cold so that the bacteria, which all foods contain, have a low level of activity and therefore reproduce less. Warm yeast cells do their work faster up to a point -- beyond that point, the temperature gets too high and the yeast cells die. See How Cells Work and How Food Preservation Works for details.
Q: Does the yeast reproduce in the bread? A: Yeast reproduces by cell division. Over the course of two hours, yeast does not really have time to reproduce. The yeast cells in the envelope of yeast are the cells that do the work in your loaf of bread. That is why, if you use old yeast, your bread will not rise. Most of the yeast cells in an old envelope of yeast have died, so there are not enough cells to power the expansion.
Q: What is sourdough bread? A: Read How Sourdough Bread Works -- it's a great article. But a quick answer is that sourdough bread uses different strains of yeast or other bacteria (like Lactobacillus). Centuries ago, before you could go to the grocery store and buy yeast, people needed a way to have yeast around the house. The way they did it was by keeping a pot of live culture (living in perhaps a quart of water/flour medium) and "feeding" it daily or weekly so that the yeast remained alive and active. To start the culture, you take 2 cups of flour and 2 cups of water, mix the two together, and then add in some sourdough culture that you obtain from a friend (sourdough, in times past, passed from friend to friend like this). When it came time to bake bread, a cup of this live culture would be added to the dough to provide the yeast needed to leaven the bread. The pot would be replenished by adding back an equal amount of flour and water. If you take some of the culture out and feed the pot more flour and water each week, the culture will stay alive. Most people let the culture live at the back of their refrigerator (otherwise, it requires daily feeding). The strains of yeast and bacteria used in sourdough are acid-producing, hence the unique flavor of sourdough bread.
For more information on bread and related topics, check out the links that follow.
Advertisement
Frequently Asked Questions
How did bread-making techniques evolve over time?
Bread-making techniques have evolved over millennia, influenced by factors such as advancements in agriculture, technology and cultural exchange, leading to the development of various types of bread around the world.
Are there any health considerations to keep in mind when consuming bread regularly?
While bread is a staple food in many diets, individuals should be mindful of portion sizes and opt for whole grain varieties to maximize nutritional benefits and minimize potential health risks.