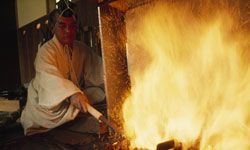
The centuries-old art of sword making involves incredibly intricate metal work, and it's still being practiced today. Get a rare glimpse into the creation of this ancient weaponry.
National Geographic/Getty Images
The merest mention of the word sword evokes images of legendary figures: English knights, Roman gladiators, Japanese ninjas or Viking warriors. Our imagination paints them larger-than-life, with their shining swords slicing through the air in dazzling arcs. We are fascinated by the sword like no other weapon, often seeing it as a thing of beauty. In fact, many swords are breathtaking works of art made by the skilled hands of a craftsman.
The price range reflects the variety. You can find all types of swords, from inexpensive machine-made replicas for as little as $50 to hand-crafted masterpieces that cost $35,000 or more!
Advertisement
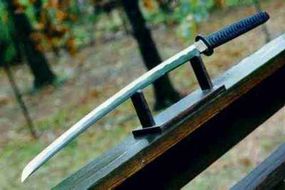
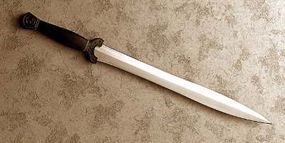
Photo courtesy Don Fogg Knives A Japanese katana.
Basically, a sword is a sharpened piece of metal that is typically between 24 and 48 inches (61 to 122 cm) in length with a handle ( hilt) on one end. The other end usually tapers to a point. In this edition article, you will learn about swords and how they are made using modern sword-making methods, including the steps needed to create a sword:
Choosing a design
Selecting the stock
Forging and shaping the blade
Normalizing and annealing the steel
Adding the edge
Tempering the steel
Adding the guard, hilt and pommel
This article covers the basics of modern sword making. There are many other methods that have been used throughout history and many differences between swords made by bladesmiths of different times and regions. The development of a Japanese sword varies significantly from the creation of a European sword. This article provides a glimpse into the fascinating world of bladesmithing.
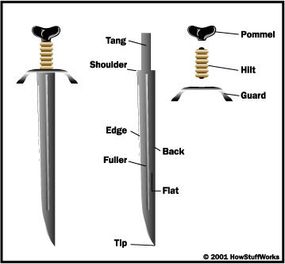
Let's get started with a look at the parts of a sword.
Blade - The length of steel that forms the sword. A typical blade has six areas:
Edge - This is the sharpened portion of the blade. A sword may be single or double-edged. For example, a Japanese katana has a single edge but a Scottish claymore is sharpened on both sides.
Tip - The end of the sword furthest away from the hilt. Most swords taper to a point at the tip, but some blade lines are straight until the very tip. A few swords, such as a U.S. Civil War saber, are curved along their length.
Back - The part of the blade opposite the edge. Of course, a double-edged sword has no back.
Flat - The sides of the blade.
Fuller - Often called the blood groove or gutter, the fuller is a narrow groove that runs most of the length of many swords. Most people believe that it is there to allow the blade to be easily removed by blood escaping through the channel, thereby reducing suction. Contrary to popular belief, the fuller is not a channel for blood to run along. The actual reason for the fuller is to decrease the weight of the blade without diminishing the strength. Use of a fuller allows a bladesmith to use less material to comprise the blade, making it lighter without sacrificing too much structural integrity. This is similar to the use of an I-beam when building a skyscraper.
Ricasso - Found on some swords, the ricasso is the unsharpened part of the blade just before the guard. It was typically used on heavier swords to provide a place to grip with the second hand if needed.
Tang - The portion of the blade that is covered by the hilt. A full tang is the same width as the rest of the blade and extends beyond the hilt and through the pommel. A partial tang does not extend all the way through the hilt and is normally not more than half the width of the blade. The length of the tang and the width, particularly where it narrows before entering the pommel, vary from sword to sword. The thickness and width of a tang within the hilt will determine the handling of the sword.
Guard - The metal piece that keeps an opponent's sword from sliding down over the hilt and cutting your hand. The guard on Japanese swords also prevented the hands from sliding down to the blade while many European sword guards also protected the hands in close quarters combat against a shield. Also, the cross guard on a European sword can aid point control and manipulation of a blade. Guards can range from a simple crosspiece to a full basket that nearly encloses your hand.
Hilt - The handle of the sword, a hilt is usually made from leather, wire or wood. It is fastened to the tang of the blade to provide a comfortable way to hold the sword.
Pommel - The end of the sword that the hilt is on. Pommels are normally larger than the hilt and keep the sword from sliding out of the hand, as well as providing a bit of counterweight to the blade. They also can be used as a means to secure the hilt to the tang, and were sometimes forged out of the same length of steel as the rest of the blade.
Swords can range from strictly utilitarian to completely ceremonial. In many swords, the guard, hilt and pommel are very ornate and serve as the focal point for the uniqueness of the sword.
Advertisement
Part of History
Edged weapons have been a part of our history for as long as records have been kept. In fact, some of the earliest tools used by primitive man were sharpened pieces of stone.
Swords and knives have played a significant role in every major civilization. Even in today's modern society, swords are used in many of the most important military or state ceremonies and functions. Think about the commercials for the U.S. Marine Corps and how they focus on the Marine saber, or the knighting ceremony performed by the Queen of England where a sword is used to touch the shoulders of the knighted individual.
Advertisement
The earliest known swords were made from copper, one of the most common metals available. Copper swords were very soft and dulled quickly. Later on, swords were made from bronze. Bronze is an alloy of copper and tin. An alloy is a mixture of two or more base metals or elements to create another metal with certain specific properties. In the case of bronze, the combination of copper and tin created a metal that is:
Stronger than copper
More flexible than copper
Stays sharp for longer than copper
A better sword was developed with the advent of iron. Iron ore was easily found in every part of the ancient world. Iron ore contains iron combined with oxygen. To make iron from iron ore, you need to eliminate the oxygen to create pure iron. The most primitive facility used to refine iron from iron ore is called a bloomery.
In a bloomery you burn charcoal with iron ore and a good supply of oxygen (provided by a bellows or blower). Charcoal is essentially pure carbon. The carbon combines with oxygen to create carbon dioxide and carbon monoxide (releasing lots of heat in the process). Carbon and carbon monoxide combine with the oxygen in the iron ore and carry it away, leaving a porous, sponge-like mass called a bloom. The bloom was then hammered to remove most of the impurities. The resulting metal was easy to work with, but iron swords did not hold an edge well and were still too soft.
Iron became the metal of choice for swords and other weapons, and helped forge new empires. Both iron and bronze weapons and tools made an incredible impact on the balance of power during the eras of their respective prominence. In fact, those periods of history are now known as the Iron Age and the Bronze Age.
Eventually, steel was discovered. Steel is an alloy of iron ( ferrite) and a small amount of carbon ( cementite), usually between 0.2 and 1.5 percent. Steel was originally made using a process called cementation. Pieces of iron were placed inside of a container made from a substance with a very high carbon content. The container was placed in a furnace and kept at a high temperature for a length of time that could range from hours to days. During this time, carbon migration would occur, which means the iron would absorb some of the carbon from the container. The resulting mixture of iron and carbon was steel.
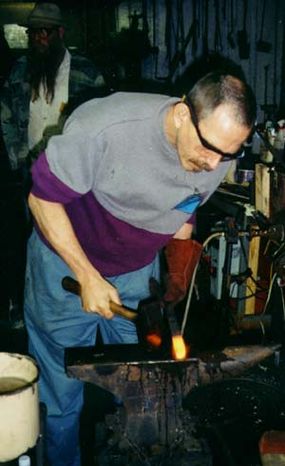
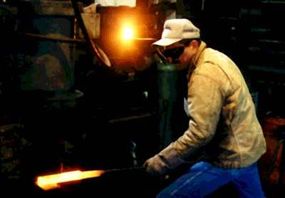
Photo courtesy Don Fogg Knives Don Fogg working at his forge
Steel has a number of advantages over iron and bronze:
It is very hard.
It is flexible when heat-treated properly.
It can stay very sharp for a long time.
It can be worked with and shaped.
It is more resistant to rust and corrosion than iron.
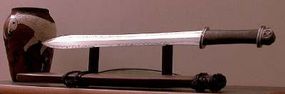
Photo courtesy Don Fogg Knives A historically-inspired representation of a Celtic sword
Almost all swords made today are some type of steel alloy. In most modern steels, there also are a number of other elements. You'll learn more about the various steel alloys later. But first, let's talk about the tools you need to make a sword.
Advertisement
Setting Up Shop
Before a bladesmith (a person who makes swords, knives and other edged implements) can create a sword, he must have the proper environment and tools. A bladesmith's shop, called a smithy, is very comparable to a traditional blacksmith's shop. Because of the fumes and dust created by the smithing process, the smithy must be well ventilated. Care should be given to the placement of the forge, anvil and other equipment to ensure that the distance that the bladesmith has to travel with the heated steel is kept to a minimum.
The basic equipment used by the bladesmith has changed very little over the last few centuries. For most smiths, the biggest change has come after the basic forging is done, by using power tools to grind and polish the steel. Tools of the trade include:
Advertisement
Anvil - The symbol of the smith, the anvil is easily the best-known and most recognizable piece of smithing equipment. A standard anvil has the following parts:
Base - The bulk of the anvil, the base usually has mounting holes drilled through the bottom to attach the anvil to a secure mount.
Face - This is where most of the shaping of the steel happens. The top of the anvil is tempered to be very hard and should be smooth. The edges are slightly rounded to make sure that they don't gouge or mar the steel. Photo courtesy Don Fogg Knives Note the hardy and pritchel holes in the face of this anvil.
Pad - A small flat section between the face and the horn, the pad is used for chisel work so that the bladesmith does not scar the face of the anvil.
Horn - The front end of the anvil that tapers from just below the pad to a rounded tip. Also called the bick, the horn is used for curving and bending the steel.
Hardy and pritchel holes - The hardy hole is a square socket in the anvil's face that holds some of the shaping tools described below. The pritchel hole is a round hole in the face that allows a punch, drill or drift to go down into the anvil. It is used for punching and shaping holes in the steel.
Hammers - The hammer is an extension of the bladesmith. He relies on it to create the basic shape of the sword. Hammers used by bladesmiths, and smiths in general, are slightly different from the typical hammer you find in a hardware store. The main difference is that smithing hammers are crowned, while most standard hammers are not. Crowned means that the edge of the hammer's head has been slightly rounded instead of squared off. Crowning keeps the hammer from making sharp indentations in the steel as the bladesmith pounds it.
Hammers vary greatly in size and purpose:
Ball, cross and straight peen - Peen hammers have a flat, crowned head, and a round (ball) or wedge (cross and straight) shape on the other side. The cross peen has the wedge sideways to the hammer while the straight peen has the wedge in line with the hammer. Peen hammers are used for most of the shaping work.
Sledge hammer and single jack - Sledge hammers tend to be big and heavy, weighing up to 20 pounds. They are used when the steel needs a lot of heavy-duty shaping and normally require a second person. One person holds the steel on the anvil while the other swings the sledge hammer. The single jack is a smaller version of the sledge hammer that can be used by one person.
Set hammer and flatter - Both of these tools have large flat heads. As you might expect, the main use of the flatter is for flattening the steel. The set hammer is used to make squared corners and flat edges.
Tongs - Tongs are a versatile tool that no bladesmith can do without. In fact, a typical smithy has several pairs of tongs. Tongs are used to hold the steel while shaping it on the anvil. They are also used to place steel in the forge and retrieve it, and for quenching the steel.
Shaping tools - Quite often, the bladesmith needs to do certain things to the steel that would be very difficult with one of the hammers. That's when he may choose one of these more specialized tools.
Hardies (bicks, fullers and swages) - These are the tools that fit in the hardy hole on the anvil. A bick is a rounded piece that can be used for curving and bending the steel, like a small horn. Fullers are used to make grooves. In fact, that is why the groove in a sword is called a fuller. Swages are used to force the steel into certain shapes, such as triangular, square or hexagonal.
Chisels - As you might expect, chisels are used to cut or gouge the steel.
Punches and drifts - Punches are used to poke, or punch, a hole through the steel. Drifts are used to expand an existing hole. The pritchel hole in the anvil provides a place for the punch or drift to go when it comes through the steel.
Forge - The tools mentioned above allow you to shape the steel once it's hot. To heat the steel requires a forge. Types of forges include coal, gas and electric. Most bladesmiths have one of these three for their main forge. The time and temperature can vary greatly depending on the steel used and the bladesmith's own technique.
Quench tank - A large metal container full of oil, the steel is submerged in the quench tank after it has been shaped. The oil used in the quench tank improves the hardening of the steel.
Slack tub - This is simply a large barrel or container of water used to cool the steel and tools.
Additional tools - Most bladesmiths have some or all of the tools listed here to round out their smithy. Also, a complement of standard tools, such as screwdrivers, saws, pliers and wrenches are useful.
Files - Used to smooth out rough edges and burrs
Vise - Used for holding pieces in a fixed position while the bladesmith works
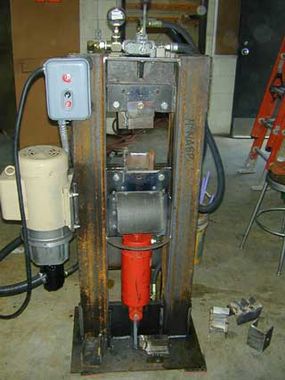
Hydraulic press - Used for rough shaping by flattening the steel
Torch - Used for cutting and rough shaping of the steel
Grinder - Used for everything from basic shaping to prepolishing
Buffer - Used to polish the completed blade
Drill press - Used to make holes in the steel
Photo courtesy Don Fogg Knives A hydraulic press built by Tommy McNabb
Once the tools are in place, then the bladesmith needs to decide what he is making and what kind of steel to use...
Advertisement
Making the Grade
What kind of steel alloy a bladesmith uses to make a sword depends largely on their experience and the characteristics they want in the blade. The alloy used is almost always a form of carbon steel. A certain amount of carbon is necessary to give the metal enough hardness to be able to take an edge and hold it. But too much carbon decreases the flexibility of the blade, making it brittle and more likely to break.
Jim Hrisoulas, author of "The Complete Bladesmith," recommends a steel with a carbon content of around 60 to 70 points. In steel, carbon content is listed as points with each point equaling 0.01 percent of the total composition. Therefore, a 70 point rating means that the alloy has 0.7 percent carbon in the mix. Don Fogg actually uses 1086 steel (.86 percent carbon) and achieves superior results. However, the higher the rating doesn't always mean better steel. A process of careful heat-treating allows for very hard blades that are resilient and tough.
Advertisement
Photo courtesy Don Fogg Knives The steel in a sword should have a carbon rating of 60 to 70 points.
Most of the steel alloys include one or more of the following elements, each one providing certain advantages (and some disadvantages). While the elements listed below are the most common, there are many others that may appear in an alloy.
Chromium - Aids hardening; used in stainless-steel alloys; can cause the steel to crack during forging
Tungsten - Provides for a sharp and long-lasting edge; hard to forge
Manganese - Adds strength during the heat-treatment process
Molybdenum - Keeps the steel hard at higher temperatures; very difficult to forge when present in high quantity
Nickel - Adds strength, does not increase hardness; appears in higher concentration in stainless-steel alloys
Silicon - Improves flexibility and hardness; can increase conductivity of the alloy
Before choosing a metal, the bladesmith creates a design for the blade and determines what the most important characteristics for that blade will be. For example, a slim blade like a rapier needs to be very flexible while a broadsword needs greater hardness and strength. The bladesmith also decides what method to use for creating the blade. This will determine which metals can be used, particularly stainless steel alloys. Stainless steel is incredibly difficult to forge and temper properly, but a bladesmith can purchase stainless steel bars and grind them into shape using the stock removal process. In stock removal, a sword blade is made by taking a stock piece of steel and removing portions of it by cutting and grinding until you have the desired shape. Most bladesmiths prefer the flexibility that forging provides them with when creating custom swords. A forged blade is created by heating the metal and pounding it into shape.
Forged swords may contain a single metal or a combination of metals. The easiest and most common form of forged sword uses a single steel alloy to create the blade. Designs are sometimes engraved or etched into the steel to simulate the more complicated pattern welding and Damascus blades.
Pattern welding, also called laminate steel or pattern-welded Damascus steel (see below), uses two or more metals combined together during the forging process. Typically, layers of a steel alloy are combined with layers of a softer metal, such as nickle. The layers are folded onto each other numerous times, which helps to further remove any impurities in the metal. It also greatly multiplies the total number of layers. If a bladesmith starts out with three layers of nickle sandwiched between four layers of steel, then a single fold will double the number of layers to 14. Another fold would make 28 layers and a third one would create a total of 56 layers!
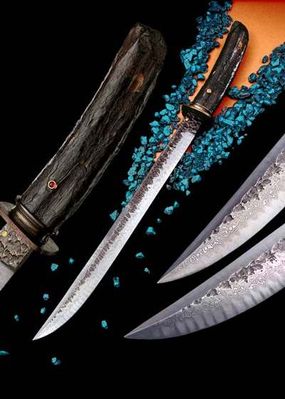
Photo courtesy Don Fogg Knives A pattern-welded Damascus blade created by master bladesmith Don Fogg
As the folding continues, the softer metal welds or glues the layers of steel together to form a single whole. The softer metal layers give the sword greater flexibility without sacrificing the hardness of the steel needed for the cutting edge. Once the blade is complete, it is given an acid wash that brings out the contrast between the metals used. The patterns created by the different metals add incredible beauty to the blade and can be quite intricate.
Damascus Steel
A technique that was considered lost for many centuries, true Damascus steel has often been confused with pattern-welded steel. In fact, many sword makers and sellers still refer to pattern-welded blades as Damascus steel.
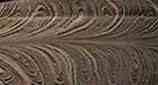
Photo courtesy Don Fogg Knives Detail of a feather pattern in a Damascus blade
J. D. Verhoeven, A. H. Pendray and W. E. Dauksch published an article in the September 1998 issue of the Journal of Metallurgy about Damascus steel that turned the sword-making world upside down. They assert that true Damascus steel is wootz steel. Wootz was a form of steel made in India that had a very high carbon content. When the steel was forged, some of the carbon would separate into bands. These bands would appear very light in color and the rest of the steel would become quite dark when polished and etched. The result was a highly contrasted pattern. As bladesmiths learned how to work with the wootz steel, they discovered that they could make the patterns very intricate by changing the angle of the blade in relation to the bands of carbon and steel.
Advertisement
Just Beat It
The bladesmith's forge is basically a large super-hot oven. Traditional bladesmiths tend to use coal forges, but many others prefer the gas or electric forge. No matter which type a bladesmith uses, the desired result is the same: To heat the steel to the proper temperature for shaping the sword.
Photo courtesy Don Fogg Knives Don Fogg working at his forge
Steel becomes red hot around 1200 to 1500 degrees Fahrenheit (649 to 816 degrees Celsius) and glows orange at about 1800 F (982 C). Most steel alloys should be worked somewhere within this range. If the steel is cooler and appears bluish in color, it can be shattered by the hammering. Conversely, the steel should not be heated any higher than 1800 F (982 C) unless specified by the alloy's use guidelines.
Advertisement
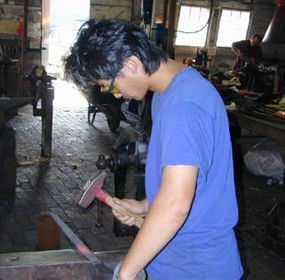
After the steel is heated, the first step is called drawing-out. When you draw out a piece of steel, you are increasing the length of the steel and reducing the thickness. In other words, you are flattening it into the basic sword shape. By hammering along one edge, the bladesmith can make the length of steel gradually curve to create a curved sword.
Photo courtesy Don Fogg Knives A student of Don Fogg drawing out the steel
Next, the bladesmith begins to taper the blade. Tapering is used to create the tip and tang of the blade. It is accomplished by hammering at an angle, beginning at the point where the taper should start and continuing to the end of the blade. Often, the tapering will create a bulge in the blade's thickness that will need to be drawn out. Once the tang is complete, the bladesmith will normally use a tap and die set to make threads on the end of the tang for the pommel to screw onto.
The bladesmith will continue to work on the blade a section at a time. He does this by heating that part of the blade (usually about 6 to 8 inches, or 15.24 to 20.32 cm) until it is red hot and shaping it with the hammer and other tools. He will flip the blade over again and again during the hammering to ensure that both sides are evenly worked.
At certain points during the forging process, the bladesmith will usually normalize the steel. This simply means that the steel is placed back into the forge and heated up again. Then it is allowed to cool without the bladesmith doing anything to it. The goal of normalizing is to smooth the grain (crystalline structure) of the steel. Essentially, each time that the smith heats up a section of the blade and works on it, he changes the grain of the steel as well as the shape. The steel is heated to a temperature that causes it to austenize (the iron and carbon molecules begin to mix). The steel is removed from the forge and air-cooled. This reduces the stress caused by irregularities in the composition of the blade and ensures that the grain is uniform throughout the blade.
Finally, before the grinding and polishing phase, the blade is annealed. Annealing seems quite similar to normalizing on the surface, but has a decidedly different result. The steel is heated to the appropriate temperature for it to austenize. The steel is then cooled back down very gradually. Usually, an insulating material is used to make sure that the steel does not cool too fast.
Annealing takes several hours to more than a day. The purpose of annealing is to make the steel soft and easy to grind or cut. Once annealing is complete, the bladesmith can start grinding the blade.
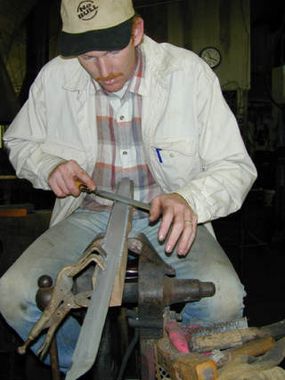
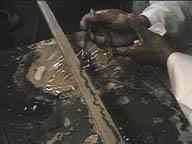
Photo courtesy Don Fogg Knives A student of master bladesmith Don Fogg filing a sword blade
Advertisement
Cutting to the Chase
Now that the blade is annealed, the bladesmith can engrave any designs and work out the edge and tip of the blade. Using a belt grinder is the most common way of adding the edge to the sword, but some bladesmiths prefer to work with files.
Since the steel is so soft, it will not hold the edge if you try to cut anything at this point. The steel must be heat-treated to harden it. Again, the bladesmith heats the blade up to the point of austenization. The blade must be evenly heated during this process. While a lot of bladesmiths use their forge for this process, some use a salt bath.
Advertisement
The salts are heated to the appropriate temperature and the blade is suspended in the salt bath for a certain amount of time. The salts used in a salt bath liquefy at a temperature lower than what is needed for the steel, but will remain a liquid beyond that temperature, creating a perfect "hot bath" for the blade. Much like a boiling pot of water, the salts evenly and thoroughly heat the steel.
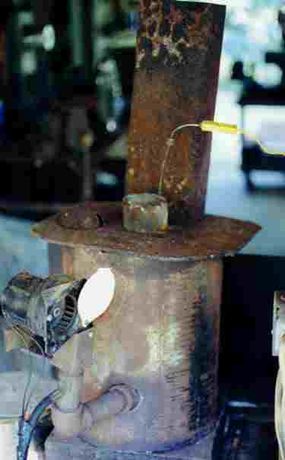
Photo courtesy Don Fogg Knives A salt bath used by Don Fogg
When the blade is removed from the forge or salt bath, it must be immediately placed into the quench tank. The oil in the quench tank causes the steel to cool rapidly and evenly. If the steel does not cool evenly for some reason, then the blade can warp or even fracture. Also, the blade must not be left in the oil too long or removed too soon. Either mistake can ruin the blade. There are general guidelines for how long to quench the blade based on the type of steel, oil or other hardening medium in the quench tank, and the thickness of the blade. Most bladesmiths will tell you that it is mainly experience and instinct combined that helps them know how long is long enough. Quenching traps cementite within the ferrite and creates a very hard steel called martensite.
Now that the steel is hardened, it can be tempered. Tempering, or heat treating, is done by heating the blade again. The difference is that it is not heated to the point that austenization occurs. Tempering uses a much lower temperature, again based on the steel used. The blade is kept at this temperature for a while, then it is quenched again. Most bladesmiths temper a blade several times to get the exact level of hardness. The idea is that the metal is hard enough to maintain an edge but not so hard that it is brittle, which can cause it to chip or crack.
Photo courtesy Don Fogg Knives A sword being coated with clay
One common method of heat treatment, particularly favored by Japanese sword makers, is to coat the blade except for the edge with a wet clay mixture that dries out and hardens as the blade is heated. The clay retains the heat and retards the cooling process. Some bladesmiths will create thicker ridges of clay that cross the blade to further slow down cooling in those specific sections. The idea here is that those sections will be slightly softer than the rest of the sword, and will increase flexibility while the edge stays hard.
Advertisement
Finishing Touches
Once the blade is tempered, the bladesmith adds the rest of the sword. The guard and pommel are usually forged by the smith at the same time that he creates the blade. The guard is welded into place on the blade, or simply snugged against the shoulders and held in place by the hilt.
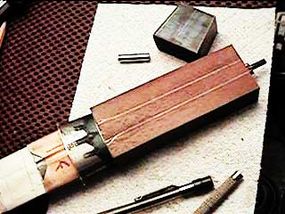
Photo courtesy Don Fogg Knives A wooden block is prepared for use as a hilt.
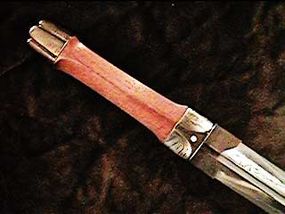
Photo courtesy Don Fogg Knives The finished hilt
The hilt may be one of several materials:
Advertisement
Wood
Metal
Wire
Bone
Leather
Plastic
The hilt is usually slipped over the tang to rest at the blade shoulder on a sword. (Knife hilts are normally riveted or glued on.) It is held in place by the pommel. The pommel either screws on to the end of the tang or it is slipped over the tang, in which case the end of the tang is flattened out to hold the pommel on. A few swords have the pommel and even the guard all created as one piece with the blade.
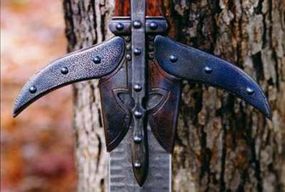
Photo courtesy Don Fogg Knives Detail of the guard on the blade from this page
After the guard, hilt and pommel are added, the finished sword is buffed and polished. Finally, a whetstone is used to sharpen the blade. The completed product is a testament to the hard work of the bladesmith.
Advertisement
Frequently Asked Questions
How has modern technology influenced traditional sword making techniques?
Modern technology has introduced new tools and materials that enhance precision and efficiency. Power hammers, hydraulic presses and advanced heat-treating ovens have supplemented or replaced manual hammering and forge heating. These advancements allow for more consistent results and the ability to work with a wider range of materials, though many artisans still cherish and preserve the traditional, hand-forged methods for their historical and aesthetic value.
What are the considerations for choosing steel alloys in sword making?
In choosing steel alloys for sword making, considerations include the desired balance between hardness and flexibility, the intended use of the sword (e.g., ceremonial vs. practical) and the specific characteristics of different alloys, such as resistance to corrosion and ease of forging. Carbon content is a critical factor, with higher carbon steel being harder and holding a sharper edge, but also being more brittle. The choice of alloy affects not only the performance of the sword but also its appearance and longevity.